Reuse Satellite Coax for OTA Antenna Setup

I set up a Gen4 Tablo this week for someone and reused their satellite cable. I was having a difficult time getting channels to show up, but eventually realized that the power injector I removed had to have a block to power. These distribution blocks are sometimes hidden - in this case under a manufactured home - and can interfere with some OTA signals and will likely cause issues whether powered or not. I bypassed the block and connected the antenna directly to the Living Room coax and, voila, it worked flawlessly.

My in-laws are now saving $231/month, which is just a little bit less than the Tablo, the 2 TB hard drive, and the antenna combined.

Below are the images referenced in this How To I put together with Gemini. Keep this in mind when you’re reusing old satellite and cable coax. I hope this helps someone wanting to do the same thing.

How to Reuse Satellite Coax for an OTA Antenna (Bypassing SWM Components)

Reusing the coaxial cable previously installed for a satellite dish is a brilliant way to save time and effort when switching to an Over-The-Air (OTA) TV antenna. However, satellite networks rely on proprietary, powered hardware that will completely block—or potentially damage—your new antenna setup if left active.

If your old system includes the components shown in the photos, here is exactly how to safely transition your wiring for pristine antenna TV reception.

Step 1: Unplug and Remove the Power Inserter

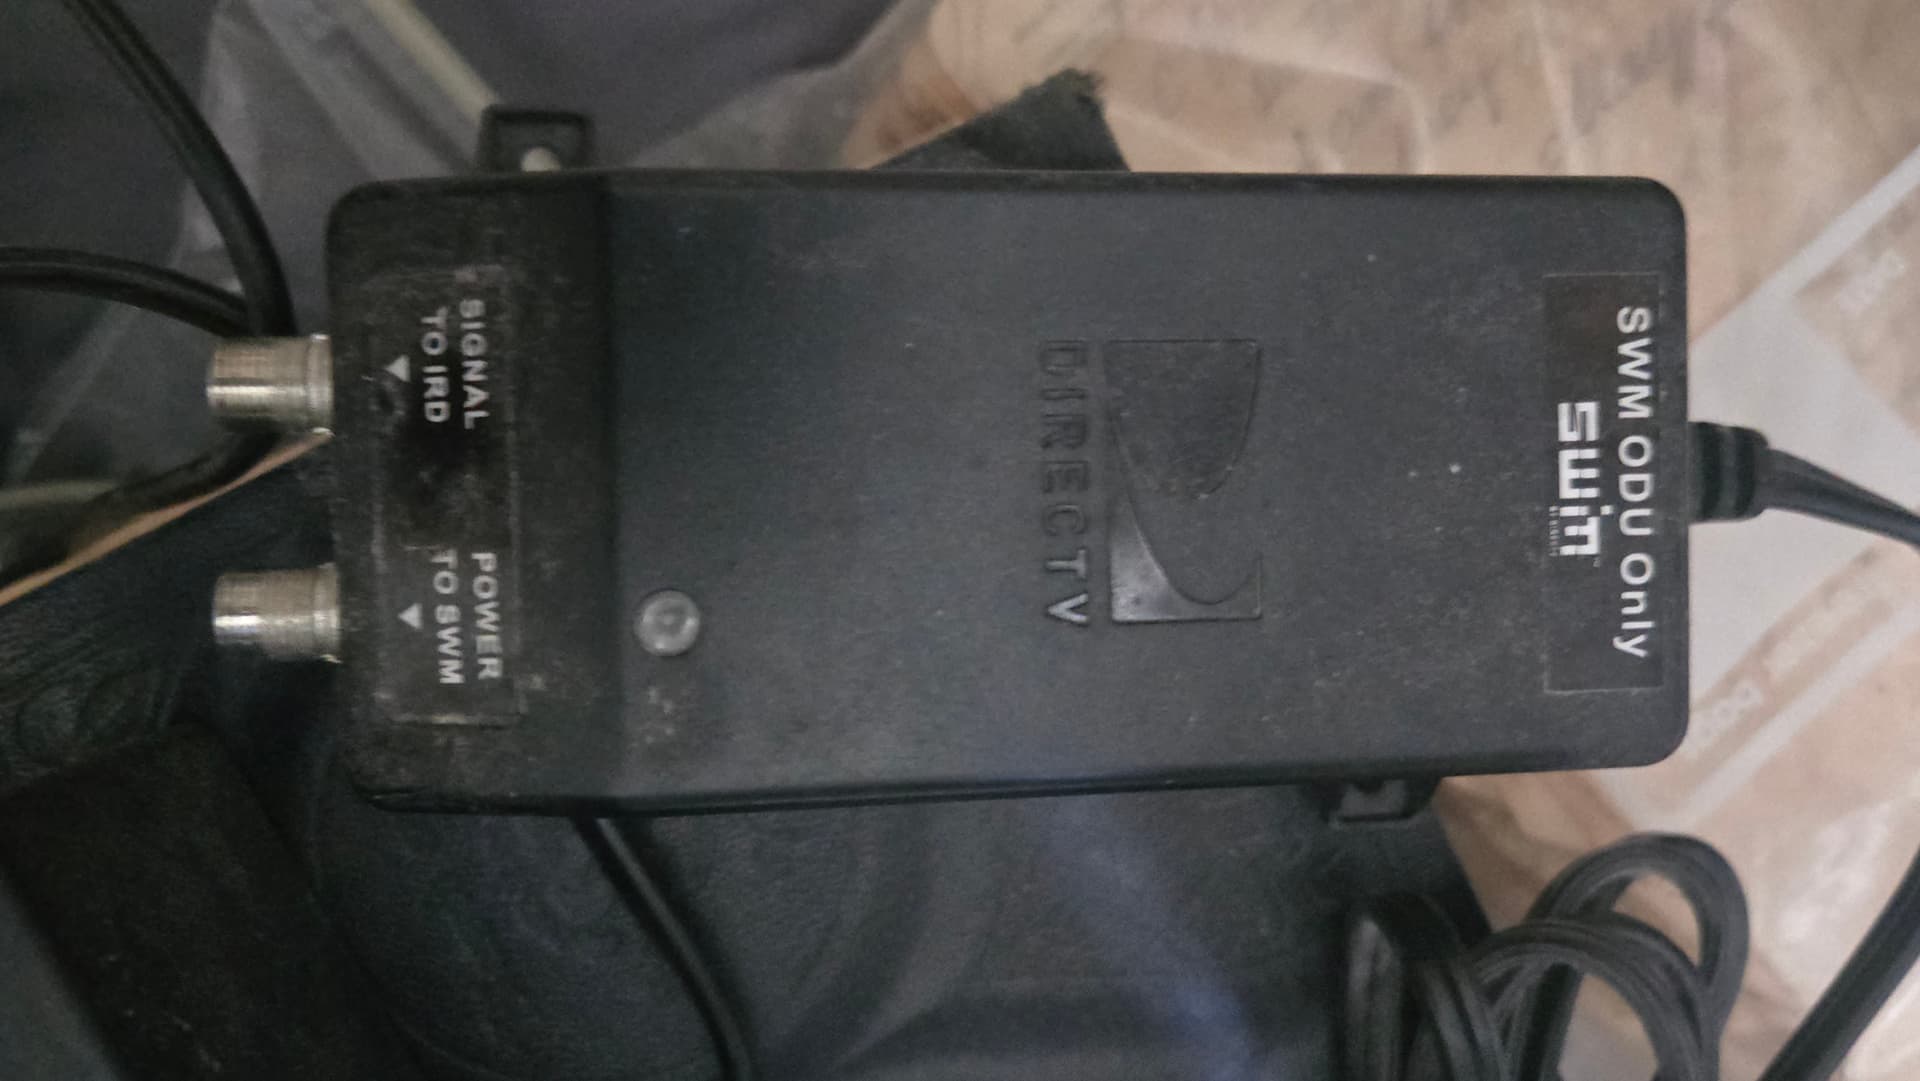
The black box labeled SWM ODU Only in file 1000036575.jpg is a DirecTV Single Wire Multiswitch (SWM) power injector. Its sole job is to send high-voltage DC power (usually 21V or 29V) back up the coaxial cable to power the satellite dish’s electronics.

  • The Danger: If you leave this plugged in, it will send live electrical current straight into your new antenna or your TV’s internal tuner. This can instantly fry a non-amplified antenna or damage your digital tuner.
  • What to do: Locate this box indoors, unplug its power cord from the wall outlet immediately, and disconnect the coaxial cables from the SIGNAL TO IRD and POWER TO SWM ports. You will not use this box for your antenna setup.

Step 2: Bypass the Satellite Splitter

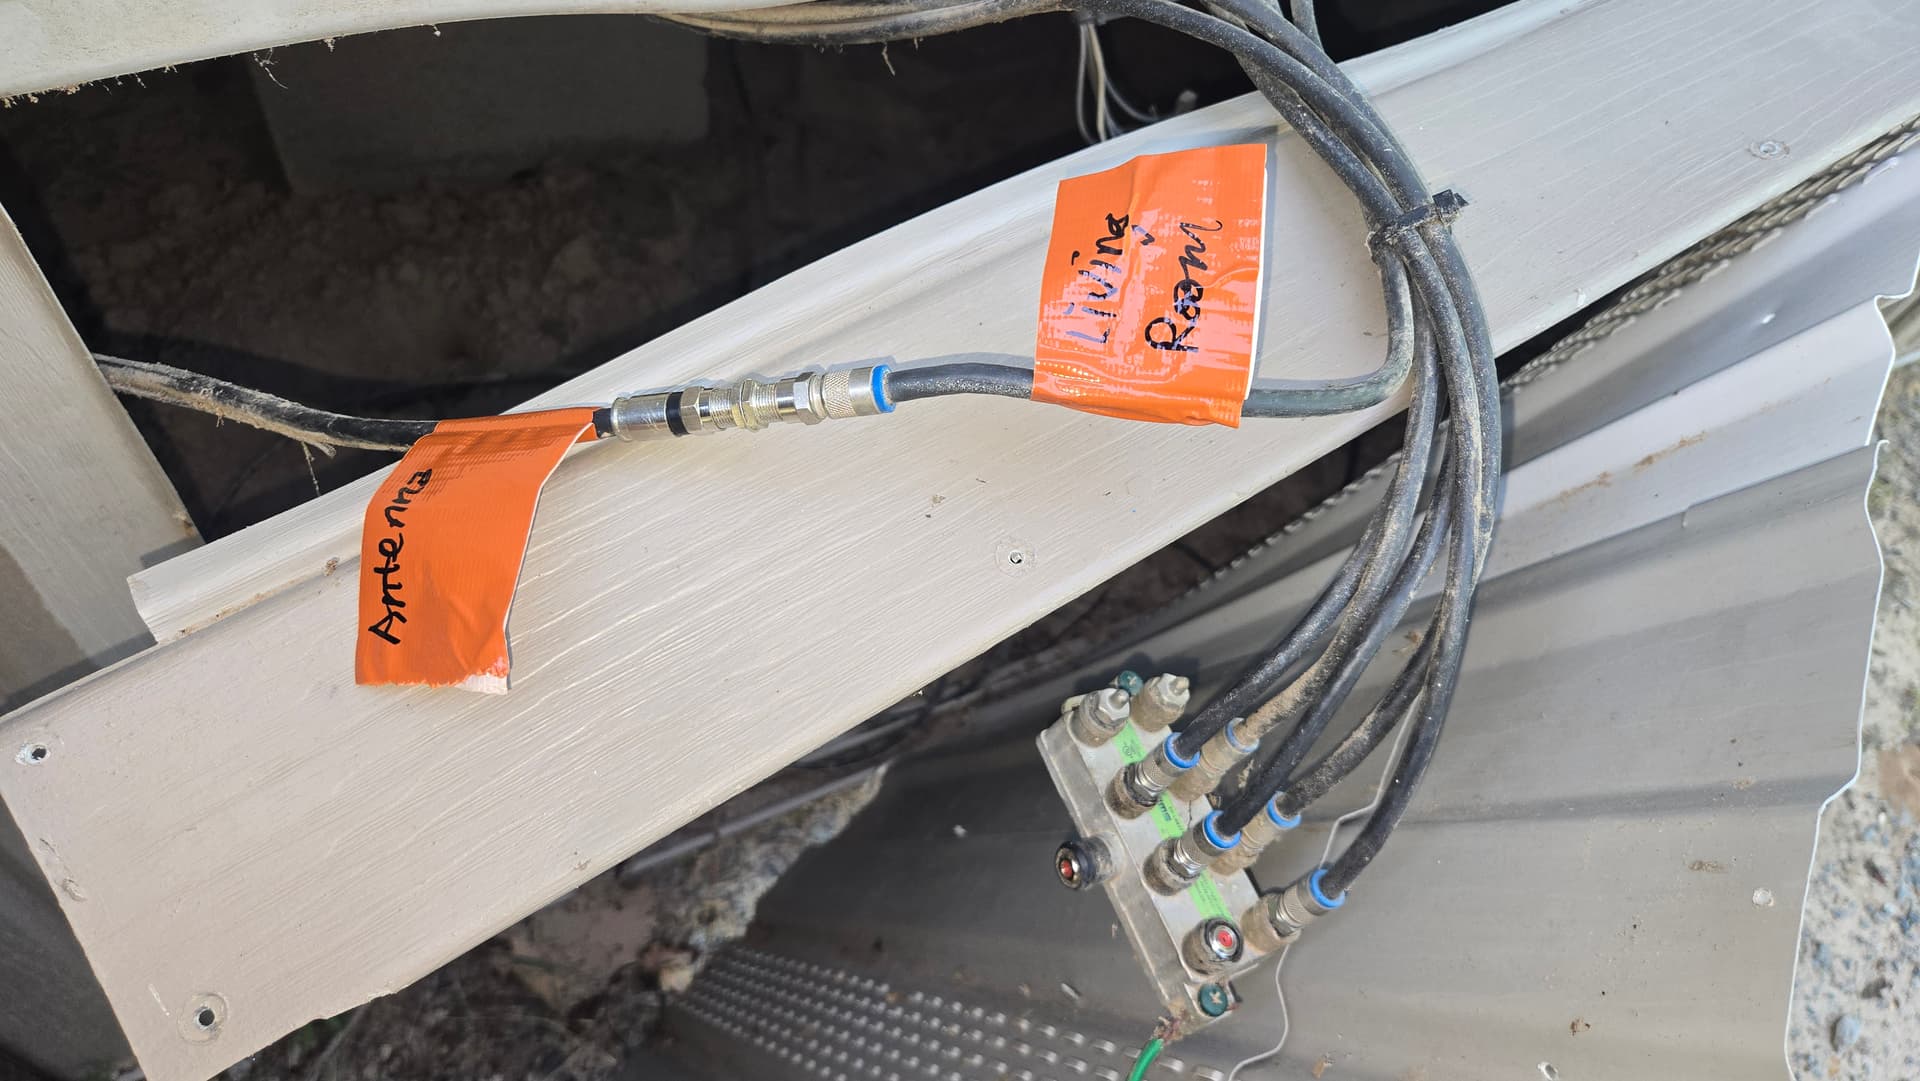
Satellite systems use specialized splitters (the multi-port metal block shown at the bottom of file 1000036579.jpg) designed for high-frequency satellite signals. These splitters frequently degrade or entirely block standard OTA broadcast frequencies.

  • The Fix for a Single TV: If you only need to send the antenna signal to one primary television, bypass the splitter entirely. As perfectly demonstrated in the top half of file 1000036579.jpg, use a cheap F-type female-to-female barrel connector to link the incoming line from the Antenna directly to the line feeding your main television (e.g., Living Room).
  • The Fix for Multiple TVs: If you want to send the antenna signal to multiple rooms using the existing lines, do not use the satellite splitter. Instead, replace it with a standard 1 GHz or 2 GHz digital cable/OTA splitter.

Step 3: Connect and Scan

Once the power injector is gone and the lines are directly joined or properly split:

  1. Connect the indoor end of your target coax line directly to the Antenna In or Air port on the back of your TV or digital converter box.
  2. Open your TV’s settings menu using your remote control.
  3. Change the tuner input setting from Cable to Antenna (or Air/OTA).
  4. Run a Channel Auto-Scan to let your TV detect all the free local broadcast networks available in your area.

Pro Tip: If your antenna signal seems weak after removing the satellite gear, it’s usually because the long coaxial run is causing natural signal loss. If needed, look into an OTA-specific pre-amplifier or distribution amplifier, which operates on much lower, safer voltages than old satellite gear.


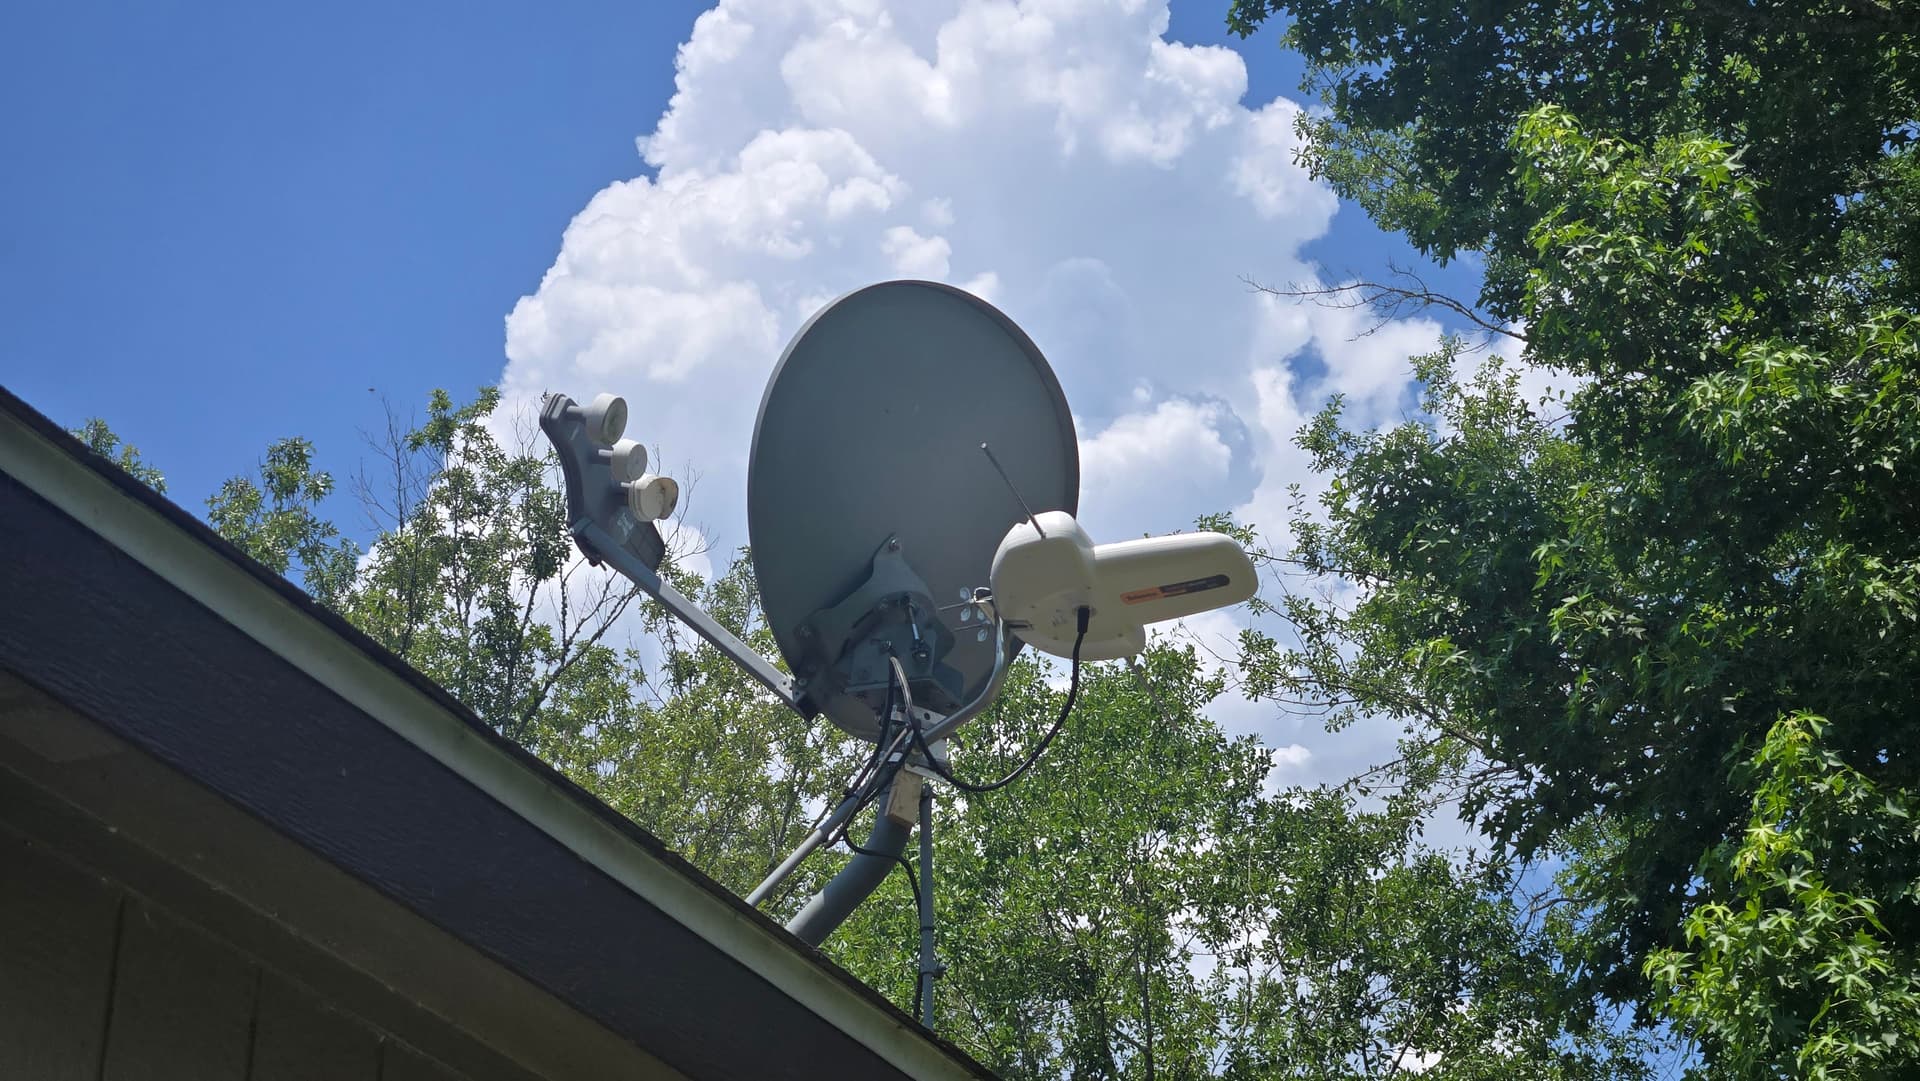
The finished product…

2 Likes

Excellent choice for the antenna! :+1:t3:

I reused the coax from my old DirecTV (very convenient). I don’t remember seeing a box like that. If I did, I likely thought it was DirecTV specific and took it out. My system runs great.

Regardless, this is great information. Thanks for sharing.

1 Like

What exactly is that antenna? I don’t recognize it.

Televes Dinova Boss

2 Likes

Towers are 27 or so miles away with one a few degrees off at 46 miles and all channels come in without any issues. This antenna also comes with a powered amplifier. Very nice and compact. I ordered this one from Lowe’s and got 10% mil discount.

Lowes link for Televes Dinova Boss

1 Like

I am curious. I noticed this antenna does not show Low VHF compatibility, only High VHF & UHF. I’m thinking about updating my bow-tie antenna with something that would do all three, since I’m hearing more and more stations are going with Low VHF. Or is that not an issue to be concerned about.

Edit: I noticed this link Boston TV Antenna Map - TV Transmitters for Boston, MA 02111 – Channel Master spells out what channels are Low VHF, but I still wonder if this an issue going forward.

Edit: They recommend this antenna with Low VHF.

Low VHF stations are relatively rare. You hear about them because they are problematic and frustrated viewers complain about it (understandably).

I would check to see if there are any Low VHF stations in your area. If not, don’t worry about it.

2 Likes

Ok, thanks! I don’t see any stations that would affect me “now”, I was just thinking long term it might change. If not, then that works for me!

Ya, I agree with @KGBnut. It’s not worth it if you don’t need those stations. But, if you really want to get RF channels 02, 05, 06, and 10 at your W to SSW direction, then you might need a VHF-specific antenna. There are some good equipment recommendations for adding an additional antenna to an existing setup in this forum.

Thankfully, the location where this Dinova Boss Mix was installed doesn’t have any VHF but I pulled out the dipoles for effect.

Check out Mr Hop To It on YT for videos on how to make a good VHF antenna at lengths for specific frequencies.

1 Like

By the way, Televes has very good technical documentation for their antennae on their website. They include Frequency Ranges, Frequency Response, and Radiation Patterns.

1 Like

Reusing existing coax deployments, from satellite, cable, or even previous antenna setups is great for the environment (no wasted materials) and your wallet, but as you found out there can be snags or pitfalls.

My first caution is what you’ve already found: splitter or combiner blocks, including those with power injectors or amplifiers. Grounding blocks or couplers may degrade signal a little, but are not usually enough to create issues. The biggest issue with older deployments, especially with cable or antennas, is daisy chained splitter blocks. These are often hidden in walls or under the house. Each split is a drop in signal, and the lower wattages used today can get choked out by passing through more than just one splitter block to multiple TVs. Best practice when setting up an antenna is to start with the closest reception device and run with no splits. This may mean having to drop a splitter and replace it with a coupler to create your run. Scan and check your results. If you’re going to connect more devices, just split using a single block with enough outputs there, or a distribution amplifier with enough outputs, if signal loss is an issue further down the line.

One last special issue with old antenna setups is if they were ‘upgraded’ to coax from the old 2 conductor ‘twinlead’ cable with it’s considerably higher 300 ohm impedance can be as bad a daisy chained splitters. If the run from the old antenna starts with the twinlead running most of the way before a matching transformer adapting to coax, you’re probably losing too much signal.

1 Like